How to Organize a Small Reach-In Closet (Layout Tips That Actually Work)
Posted February 26, 2026
A standard reach-in closet is between 4 and 8 feet wide, roughly 24 inches deep, and 8 feet tall. That’s about 120 cubic feet of potential storage. Most reach-ins use less than half of it — one hang bar across the top, a single shelf above, and the rest of the volume wasted as empty air.
The good news: a smart layout can add 30% or more usable storage to the same closet without renovating walls. Here’s the method professional closet designers use, broken into 5 steps you can do this weekend.
Step 1: Measure (and Measure Right)
Before you buy a single component, measure:
- Width — wall to wall (or wall to opening jamb).
- Depth — back wall to door frame.
- Height — floor to ceiling (or floor to top of usable wall, if there’s a soffit).
- Door swing — if it’s a swing door, where does it land? Don’t put a drawer where the door blocks it.
The biggest mistake people make: assuming their closet is “standard.” Reach-ins built before 1990 often vary by an inch or two from the framing standard. Measure, don’t guess. See our measurement guide.
Step 2: The Three-Zone Method
Every well-organized reach-in breaks the wall into three vertical zones. Each zone serves a different storage purpose:
- Top zone (above 80″) — Adjustable shelves for storage bins, off-season clothes, suitcases, and items you reach for less than once a month.
- Middle zone (40″–80″) — Hang bars. Single-hang for dresses and long coats; double-hang for shirts above folded pants — this is where you reclaim the wasted air space most reach-ins have.
- Bottom zone (floor to 40″) — A column of drawers and/or shoe shelves. Drawers are dramatically cleaner than open shelves for folded clothes.
One side of the closet should typically be drawers + double-hang; the other side single-hang for longer items. This pattern alone usually adds 30%+ capacity over a single hang bar.
Step 3: Use Vertical Space (the Most-Wasted Resource)
Most reach-ins waste 18″–36″ of vertical space above the standard hang bar. Adding adjustable shelves above the hang bar gives you back 5–8 cubic feet of storage for free. A few rules:
- Top shelves should be deep enough to hold storage bins (typically 12″–15″).
- Use clear bins so you can see what’s in them. Labels work too.
- Heavy stuff goes lower; rarely-used stuff goes higher.
For a system that handles all this, see our solid wood reach-in closet systems.
Step 4: Don’t Hang What You Should Fold
Half of what most people hang doesn’t need to be hung. Folded items take 1/3 the linear space of hanging clothes. Fold these:
- T-shirts and casual tops
- Jeans and folded pants
- Sweaters (always fold — hangers stretch shoulders)
- Workout clothes
- Pajamas and loungewear
Hang only what wrinkles or hangs better than it folds: dress shirts, blouses, dresses, suit jackets, full-length coats, dress pants. Splitting the hang/fold ratio correctly opens up bar space for the things that actually need it.
Step 5: Reach-In Closet Mistakes to Avoid
The five most common reach-in mistakes:
- Filling the depth — A 24″-deep closet doesn’t need a 24″-deep system. 15″ depth lets you see folded items more easily and is the closet industry’s most popular depth. See 15″ deep closets.
- One hang bar at full height — Wastes everything above the bar. Add adjustable shelves up top.
- Floor-stacked shoes — They migrate, get dusty, and get lost. Use angled display shelves instead.
- Wire shelving — Snags fabric, sags, and items fall through. See the wire vs. wood comparison.
- Fixed (non-adjustable) shelves — Your wardrobe changes; your shelves should too. Adjustable peg systems let you reconfigure in minutes.
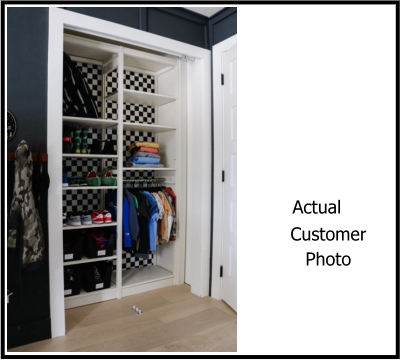
The 6-Foot Reach-In: A Real Example
One of our most popular Lundia configurations is a 6-foot reach-in. Here’s the layout:
- Left bay (3 ft wide) — Top: two adjustable shelves for storage bins. Middle: double-hang (shirts on top, folded pants hanging below on a second bar). Bottom: 4-drawer column.
- Right bay (3 ft wide) — Top: shelf for hats and bins. Middle: long-hang for dresses, suits, full-length coats. Bottom: angled shoe display shelves.
That’s about 80′ of hang capacity (long + short combined), 4 drawers, 4 shelves, and angled shoe storage — all in a 6-foot closet that previously held a single hang bar and one shelf. See real customer reach-in examples.
Reach-In Closet Organization — Frequently Asked Questions
What’s the best depth for a small reach-in closet?
15 inches is the closet industry’s most popular reach-in depth, and it’s our most popular at Lundia. Hanging capacity is identical to 18″ or 24″ (clothes hang on the bar at the same width regardless of depth) — clothes just stick out about 5″, which is industry standard. 15″ also makes folded items easier to see and saves room space. More on 15″ depth.
Will a closet system fit if my reach-in is only 4 feet wide?
Yes. Lundia builds reach-in systems as narrow as 4 feet wide. The smaller the space, the more important the layout is — a single bay with double-hang and a drawer column doubles what a 4-foot closet typically holds.
Do I need to remove my old wire shelving first?
Yes — remove the wire and patch the wall holes. Lundia uprights mount with a few wall anchors and the rest of the system locks together with a peg system. Most reach-in installs take 2–4 hours. See how Lundia works.
Can I add doors to a reach-in wood closet system?
Yes — bifold, sliding, or French. Sliding doors are the most space-efficient for tight rooms. Note that doors only close cleanly in front of all hanging clothes at 24″ depth; at 15″ or 18″, doors work in front of shelves and shorter hanging items. More on reach-in doors.
Get a free reach-in closet design
Send us your closet’s width, depth, and height — we’ll draft a custom solid-wood layout for free, with no obligation.
Get My Free DesignRelated reading:
← Back to Blog